Sunday, July 18, 2010

10 Most useful Windows7 tips Plus 10 Useful Shortcuts

10 Most useful Windows7 tips
  1. I Want My Quick Launch Toolbar Back! You might have noticed that the old faithful Quick Launch toolbar is not only disabled by default in Windows 7, it’s actually missing from the list of toolbars. As is probably obvious, the concept of having a set of pinned shortcut icons is now integrated directly into the new taskbar. Based on early user interface testing, we think that the vast majority of users out there (i.e. not the kind of folk who read this blog, with the exception of my mother) will be quite happy with the new model, but if you’re after the retro behavior, you’ll be pleased to know that the old shortcuts are all still there. To re-enable it, do the following:
    • Right-click the taskbar, choose Toolbars / New Toolbar
    • In the folder selection dialog, enter the following string and hit OK: %userprofile%\AppData\Roaming\Microsoft\Internet Explorer\Quick Launch
    • Turn off the “lock the taskbar” setting, and right-click on the divider. Make sure that “Show text” and “Show title” are disabled and the view is set to “small icons”.
    • Use the dividers to rearrange the toolbar ordering to choice, and then lock the taskbar again.

    If it’s not obvious by the semi-tortuous steps above, it’s worth noting that this isn’t something we’re exactly desperate for folks to re-enable, but it’s there if you really need it for some reason. Incidentally, we’d love you to really try the new model first and give us feedback on why you felt the new taskbar didn’t suit your needs.

  2. Windows Vista-Style Taskbar. I wasn’t initially a fan of the Windows 7 taskbar when it was first introduced in early Windows 7 builds, but as the design was refined in the run up to the beta, I was converted and now actively prefer the new look, particularly when I’ve got lots of windows open simultaneously. For those who really would prefer a look more reminiscent of Windows Vista, the good news is that it’s easy to customize the look of the taskbar to more closely mirror the old version.To achieve this look, right-click on the taskbar and choose the properties dialog. Select the “small icons” checkbox and under the “taskbar buttons” setting, choose “combine when taskbar is full”. It’s not pixel-perfect in accuracy, but it’s close from a functionality point of view.
  3. Get a power efficiency report If you have a laptop, you can use the efficiency calculator to get Windows 7 to generate loads of useful information about its power consumption. Used in the right way, this can help you make huge gains in terms of battery life and performance. To do this you must open a command prompt as an administrator by typing 'cmd' in Start Search, and when the cmd icon appears, right-click it and choose Run as administrator.

    Then at the command line, just type in 'powercfg -energy' (without quotes) and hit Return, and Windows 7 will scan your system looking for ways to improve power efficiency. It will then publish the results in an HTML file, usually in the System32 folder. Just follow the path it gives you to find your report.

  4. Enable or Disable UAC From thr Windows 7 / Vista :
If you’ve used Windows Vista for more than 3.7 minutes, you know what UAC (User Account Control) is.. it’s the obnoxious, nagging popup window that will be your life for the next 3-5 years unless you switch back to XP in frustration, or to a better OS like… OS X, Suse, Ubuntu, or even XP.

Update: This should also work on Windows 7.

Note: Disabling UAC will lead to a less secure system, so be warned.

Windows needs your permission to annoy the crap out of you: There’s a quick way you can enable or disable this annoying window from the command line:

Disable UAC

C:\Windows\System32\cmd.exe /k %windir%\System32\reg.exe ADD HKLM\SOFTWARE\Microsoft\Windows\CurrentVersion\Policies\System /v EnableLUA /t REG_DWORD /d 0 /f

Enable UAC

C:\Windows\System32\cmd.exe /k %windir%\System32\reg.exe ADD HKLM\SOFTWARE\Microsoft\Windows\CurrentVersion\Policies\System /v EnableLUA /t REG_DWORD /d 1 /f

After you enable or disable UAC, you will have to reboot your computer for the changes to take effect.

5.Explore God Mode Windows 7 has changed Control Panel a little, but it's still too difficult to locate all the applets and options that you might need. God Mode, however, while not being particularly godlike, does offer an easier way to access everything you could want from a single folder.

To try this out, create a new folder and rename it to:

Windows 7 god mode

The first part, "Everything" will be the folder name, and can be whatever you want: "Super Control Panel", "Advanced", "God Mode" if you prefer.

The extension, ED7BA470-8E54-465E-825C-99712043E01C, must be entered exactly as it is here, though, including the curly brackets. When you press [Enter] this part of the name will disappear, and double-clicking the new folder will display shortcuts to functions in the Action Centre, the Network and Sharing Centre, Power options, troubleshooting tools, user accounts and others - more than 260 options in total.

6.Recover screen space The new Windows 7 taskbar acts as one big quick launch toolbar that can hold whatever program shortcuts you like (just right-click one and select Pin To Taskbar). And that's fine, except it does consume a little more screen real estate than we'd like. Shrink it to a more manageable size by right-clicking the Start orb, then Properties > Taskbar > Use small icons > OK.
7.The Widescreen Tip. Almost every display sold these days is widescreen, whether you’re buying a notebook computer or a monitor. While it might be great for watching DVDs, when you’re trying to get work done it can sometimes feel like you’re a little squeezed for vertical space. As a result, the first thing I do when I set up any new computer is to dock the taskbar to the left hand side of the screen. I can understand why we don’t set this by default – can you imagine the complaints from enterprise IT departments who have to retrain all their staff – but there’s no reason why you as a power user should have to suffer from default settings introduced when the average screen resolution was 800x600. In the past, Windows did an indifferent job of supporting “side dockers” like myself. Sure, you could move the taskbar, but it felt like an afterthought – the gradients would be wrong, the Start menu had a few idiosyncrasies, and you’d feel like something of a second-class citizen. The Windows 7 taskbar feels almost as if it was designed with vertical mode as the default – the icons work well on the side of the screen, shortcuts like the Win+T trick mentioned previously automatically switch from left/right arrows to up/down arrows, and so on. The net effect is that you wind up with a much better proportioned working space. Try it – in particular, if you’ve got a netbook computer that has a 1024x600 display, you’ll immediately appreciate the extra space for browsing the Internet. For the first day you’ll feel a little out of sync, but then I guarantee you’ll become an enthusiastic convert! 8. Protect your data USB flash drives are convenient, portable, and very easy to lose. Which is a problem, especially if they're carrying sensitive data. Fortunately Windows 7 has the solution: encrypt your documents with an extension of Microsoft's BitLocker technology, and only someone with the password will be able to access it. Right-click your USB flash drive, select Turn on BitLocker and follow the instructions to protect your private files.
Bitlocker

PROTECT YOUR DATA: Your USB flash drives can easily be encrypted with BitLocker

9.Search privacy By default Windows 7 will remember your PC search queries, and display the most recent examples when searching in Windows Explorer. If you're sharing a PC and don't want everyone to see your searches, then launch GPEDIT.MSC, go to User Configuration > Administrative Templates > Windows Components > Windows Explorer, double-click "Turn off display of recent search entries..." and click Enabled > OK.

10.Fix Explorer The Windows 7 Explorer has a couple of potential annoyances. Launching Computer will no longer display system folders like Control Panel or Recycle Bin, for instance. And if you're drilling down through a complicated folder structure in the right-hand pane of Explorer, the left-hand tree won't always expand to follow what you're doing, which can make it more difficult to see exactly where you are. Fortunately there's a quick fix: click Organize > Folder and Search Options, check "Show all folders" and "Automatically expand to current folder", and click OK.

Keyboard shortcuts

1.Alt+P Display/ hide the Explorer preview pane

2.Windows Logo+G Display gadgets in front of other windows

3.Windows Logo++ (plus key) Zoom in, where appropriate

4.Windows Logo+- (minus key) Zoom out, where appropriate

5.Windows Logo+Up Maximise the current window

6.Windows Logo+Down Minimise the current window

7.Windows Logo+Left Snap to the left hand side of the screen

8.Windows Logo+Right Snap to the right hand side of the screen

9.Windows Logo+Home Minimise/ restore everything except the current window

10.Shift when you insert a CD Prevent the CD from automatically playing

From BBC

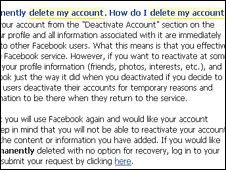
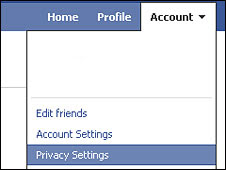
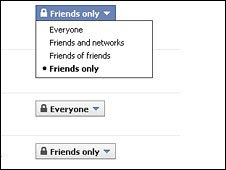
A guide to protecting your privacy on Facebook Mark Zuckerberg, AP Facebook founder Mark Zuckerberg has announced changes to the site's settings following criticism from users, regulators and commentators. The social network said it will offer a one-stop shop for privacy settings, after Mr Zuckerberg admitted the controls had "gotten complex" for users. Mark Zuckerberg admitted Facebook "missed the mark" over privacy LJ Rich takes a look at the changes and helps users adapt their own privacy settings. PERSONAL PROFILE Users should be aware that their name, gender and profile picture are visible to at least their friends. Profile pictures and names are also automatically displayed when you write a comment on someone's wall. Check your current privacy status by clicking on Account in the top right hand corner of the homepage, and choose Privacy Settings from the drop down menu. Once the Basic Directory Information page comes up, click on the View Settings link at the end of the first paragraph of text. Then select from the dropdown lists who can see information such as your hometown, list of friends, and hobbies. Check your privacy status by clicking on the Account section Some of the information can be made visible to the user only - to do this select Customise from the dropdown and choose "make this visible to" Only Me. SHARING ON FACEBOOK The "Sharing on Facebook" section of the Privacy Settings page controls who can see what you are up to on the site. Facebook's recommended settings on sharing personal details are very open. Choose less exposure by picking Friends Only, or choose Customise Settings in very small blue writing at the bottom of the section. Once in this customisation page, you can lock up information such as who sees your e-mail address, mobile phone and who is allowed to write on your message wall. When you write a status update you only want certain people to see, click the padlock symbol under the status update box for more options. Users can customise who can see what they are up to on Facebook APPLICATIONS AND WEBSITES This part is in the bottom left corner of the Privacy Settings page. Go into this setting if you use applications and games such as Farmville or Bejeweled Blitz. Click "remove unwanted or spam applications" to clean up your profile. Also, you can remove your profile from public searches by going into Edit Settings and unticking the box. BLOCK LISTS You can block individual users using this, but bear in mind they will still be able to interact with you through some games and apps. QUITTING FACEBOOK If you decide you want to deactivate your Facebook account, head to the Account settings (top right of the homepage) and click on Deactivate Account. You will be taken to a short form to fill out - be aware that deactivation means Facebook will still keep your profile dormant in case you want to re-activate it again. It will no longer accessible to other users. If you want to go the whole way and cancel your Facebook account, scroll down to the bottom right of the screen and select the Help Centre. Then type "delete my account" into the search bar, select the query "I want to permanently delete my account" and request deletion by clicking on the "here" at the end of the sentence. Confirm your intentions by hitting "submit". An account can be permanently deleted by going to the Help Centre